A new article is "on the way", but may still take some time before it's finished.
”My way” of taking fish photos!
| This is not a description of how to take photos of aquarium fishes, it’s just an account of the way I do it. Don’t look at this as ”THE WAY” to do it but if you find some useful tips, you’re welcome to try them! | |
|
|
|
 |
The Aquarium: |
|
Filtration and cleaning: One of my biggest problems has always been getting the water free of pollution and dust etc. and I’ve tried several variations of filtration. The slightest pollution shows up on the photos! Earlier I used an Eheim 2211 external filter that yields about 300 liters/hour to each aquarium, and that wasn’t sufficient :-) I have continued to test different sorts of filters and at the moment I’m using a Vortex diatom filter to get rid of, as much as possible, the dust and other small particles. This filter seems to do the job, at least at the moment. I have also tried an under gravel filter but when one has a very active fish in the tank, it churns up much of the pollution that has collected in the gravel. That wasn’t the idea! Before I start shooting I always clean the front glass, both on the inside as well as the outside. I usually clean the inside the day before I start taking photos, so the filter has a chance to remove any particles that get disturbed. For the inside I use a “makeup sponge”, because filter floss tend to leave threads in the water. On the outside I use a good window cleaner with a soft cloth. I don’t think there is anything more frustrating than having a good picture spoiled because of some spots on the glass. When one has sometimes experienced this, one learns to be more careful with cleaning the glass :-) |
|
Lightning: For the plants I use a “normal” fluorescent-lamp at 30 watts, which goes over both of the aquariums. The same lightning is moved towards the front when it’s time to take photos, to get enough light the set the focus. To get enough light for the photos, I use two or three flashes. I have also tried to use different kind of lamps, but in the end it always got to warm in the aquariums. |
|
|
At the beginning I only used one
flash but I found that I almost always got projected shadows on the
ventral and anal fins of the fishes with this lighting. I then got
another flash, which I also placed at the front. This helped against the
projected shadows but now the background got too dark in proportion to
the fish. With the help of a third flash these differences got smaller.
The position of the flashes varies a bit. Most of the time I place two
flashes at the front, angled above and from the side and a third flash
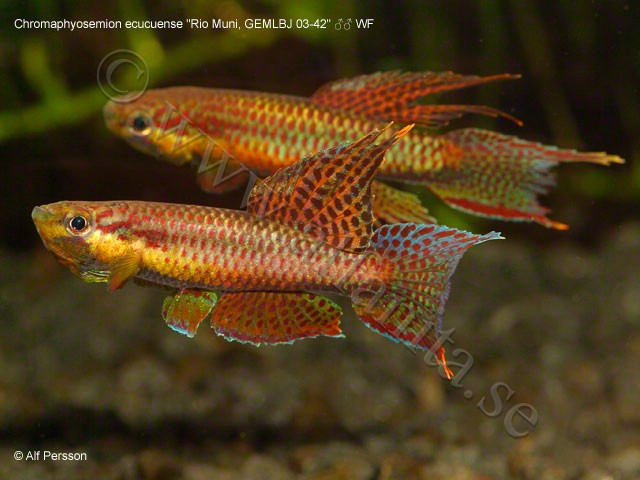
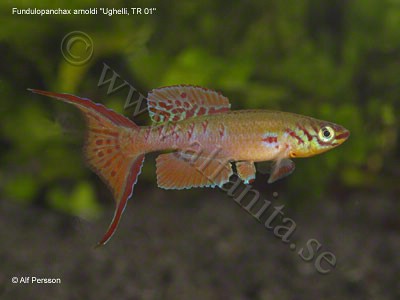
from behind, directed forward, to light up the background. For a long time I had a problem I called the “Amietisyndrom”, because it became very obvious when I tried to take photos of Fundulopanchax amieti. This problem showed itself in the way that some blue, green or turquoise colors were completely wrong, they could become anything from greenish to red-brown, whilst other colors where correct (See the examples). I had this same problem with some other fishes as well, for example Nothobranchius cyaneus, Aphyosemion spec. “Oyo, RPC 91/8” etc. but I first noticed it with Fp. amieti because it is VERY obvious here. Thanks to some tips from good friends, I managed to solve the problem. With the help of a flashlight I did some tests and I could see everything from the “correct” to the “incorrect” color, depending of the angle of the flashlight! By moving one of the flashes to above the aquarium, the problem was solved. It has taken me quite some time to find a way to get the flashes to stay were they should be and at the same time be able to easily move them. |
  |
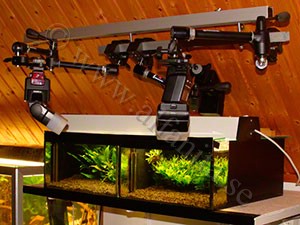
| The fact that I use two aquariums didn’t make it easier. After several tests I found that Manfrotto’s “Magic arm” does the trick of holding the flashes in place. To move the flashes between the two aquariums, I have mounted these “Magic arms” on a rail, originally made for a sliding door. This way I can easily move the flashes back and forth between the two aquariums. | |
|
”Film” or Digital: A question that arises when discussing fish photography, is which film to use. Or should I use a digital camera? Because one of my purposes has always been to be able to show the pictures to those interested, the use of color negative film, to get color prints was immediately discounted by me. Remaining is slide film and digital photography. For a long time I used a SLR camera, together with slide film but I never enjoyed waiting for the film to be developed. I especially remember one time when I spent the whole weekend taking fish photos, at least 15-20 different species/strains and I felt quite satisfied when I sent the 7 rolls of film for developing. I must say that I didn’t feel satisfied when I saw the results, because I had unintentionally changed a setting on the flash, and almost all of the pictures were too dark. Out of these 7 rolls of film I got 2 usable well, almost usable pictures! This made me try the digital cameras more eagerly, with varying results. The first digital camera I bought was a Nikon Coolpix 900, and it worked quite well for “ordinary” photos but I never could get any good fish photos with it. I also tried using a Nikon Coolpix 950 but I wasn’t satisfied with this either. To be restricted to the use of built-in flash is definitely a limitation. When Canon released its G2 camera I immediately bought one and this time it was better. Now I was able to use an external flash. But the auto focus was too slow, so I had to use manual focus, and that wasn’t optimal. When I was taking photos of the larger Malawi cichlids it worked almost all right but when it comes to taking photos of killies I still used my old SLR. At least I now was able to use the same flashes, because my SLR was a Canon EOS. Of course I glanced furtively at Canon’s EOS D30, one of the best digital SLR at the time, but the price was not so compelling and the resolution wasn’t as high as I wished. When Canon released the EOS D60 I just had to test if it was working as well as my ordinary SLR. Since I could use the same macro lens the test was soon on its way and now it felt great. I had the same “feeling” as with my ordinary SLR but with the advantages that I could see the result immediately. Now there was no return! I just had to pay all the thousands of Swedish kronor and go for it. Today I use the digital SLR camera for all my fish photos and for almost everything else as well. |
|
More about the technique Camera: As I already said, I’m using my Canon EOS D60 almost exclusively. Lenses: My favorite lens for fish photos is a 100/f 2.8 macro lens. It does have it’s limitation in the small dept of focus at f 2.8, I almost never use it at aperture f 2.8, I tend to use f 8 or f 11 most of the time. One of the reasons that the 100 mm macro lens became my favorite is that I don’t have to get quite as close to the fish as I would have to with a 50 mm lens: this way I don’t scare the fish so easily. If it’s small fishes that I’m taking photos of I have to be close anyway but with bigger fishes I can move away a bit. My camera has a 1.6x lens magnification, it helps when I take photos of small fishes. My 100 mm macro lens acts as a 160 mm lens when fitted to my D60. Most of the time I try to make the fish fill as much as possible of the frame, of course without excluding anything of the fins. Lightning: To be able to use aperture f8 or f11 it takes a lot of light! If one at the same time wishes to avoid projected shadows and other nuisances, one needs several sources of light. It’s not enough with one powerful flash, because then the fish will be unevenly lit up. This I learned the hard way ….. Today I use 3 Canon Speedlite 550 EX flashes, with a ST-E2 wireless management system. All three flashes are mounted on the same rail, for easy movements between the two photo aquariums. Tripod: I have tried different kinds of tripods, but the one that suited me best was a monopod. At the moment I’m not using any tripod or monopod. On the other hand, I use a comfortable office chair on wheels, which makes it easy to move around. Auto focus: Gladly and most of the time I use auto focus! It’s not always that the camera is fast enough and then it has to be manual focusing. To make the automatic focusing work as well as possible, it’s necessary to have a lot of light. And of course one needs a good camera. If one doesn’t have both of these, it might be better to go for manual focusing from the beginning. File format: ALL my fish photos are taken with the file format RAW. This is, as the name suggests, a raw format and the camera doesn’t interpret the signals from the processor at all, it just saves the information to the memory card. With this file format I can change a lot of things afterwards in the computer, like color temperature, exposure compensations, contrast, sharpening and even other things. In my computer I also convert the pictures to JPG for the web and in some cases to TIFF so they can be printed in some Killie newspaper. To get as sharp and ‘noise-free’ pictures as possible, I use as low sensitivity as possible, in my case ISO 100. |
|
”Tips & Tricks” Anyone who has been into taking fish photos, or any other hobby, learns some tricks on the way. Here are some of “my” tricks. Some I think I’ve found out myself and others I’ve “stolen” from someone smarter then me :-) Why re-invent the wheel, it’s working great, or …….. When I started to take photos of fishes I got a quite a few photos where one could see my hands or fingers as reflections in the front glass. This was solved by putting a black, matt paper board almost at the front of the lens. Of course I didn’t get it right the first time but nowadays I use a black “scenery cardboard” that I bought as A4 size. After cutting hole for the lens in the middle of the board, I use a scissor to cut off anything not necessary. It should hide what’s necessary, nothing more! Talking about reflections in the glass, I got more than a few pictures “destroyed” by reflexes in the glass, both from flashes, other aquariums and from windows. After a couple of tries, I now use dark window shades and even cover aquariums that might give reflexes. Flashes are a different kind of problem, which might best be solved by trying different placing of the flash units. I haven’t solved this completely but it’s not a big problem at the moment. Sometimes one hasn’t thought everything over before starting to take photos and afterwards, when looking at the results, one can sometimes see strange “stripes” or “dots” as reflections in the glass. More than once these “stripes and dots” have come from my clothes! Nowadays when I’m taking fish photos I always wear a black T-shirt and jeans. It’s neither difficult nor uncomfortable to wear this kind of clothes and I avoid some reflections. I’m sure I’ve said it before, but I say it again. CLEAN THE GLASS, both the inside as well as the outside. I’ve had to throw away LOTS of pictures because of stains on the glass of one kind or another. It’s incredibly “unprofessional” and completely unnecessary not to take care of this before starting. If one visits someone else it might be a problem to clean the inside but there’s no excuse for not cleaning the outside. I’ve said it before, but I say it again. CLEAN THE GLASS!!!! How many pictures should one take of a particular fish? I have always believed in the principle of taking many pictures, and then throwing away the bad, or not so good, ones! While I was using slide film, I couldn’t take an “unlimited” number of photos of the same fish, so most of the time I only used to take 10 to 36 pictures of the same fish. With the digital technology there’s no extra money involved when taking extra pictures, so it’s not that unusual that I take more than 100 pictures of one fish. On some occasions it has taken several days to get these pictures but on other occasions it’s been done in an hour or so. One should not forget to delete the rejected pictures, because no one would want to see them anyway and soon enough the disc will be full anyway. :-) I usually save the 2 to 6 of the best photos of each fish. If I get a better photo later on I might discard some of the photos that were saved earlier on. Sometimes one doesn’t get ANY acceptable photos at all, even after several days, and then one has to give it up for the moment and try later. Hopefully it will be a success story the next time. |
|
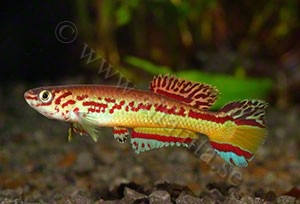
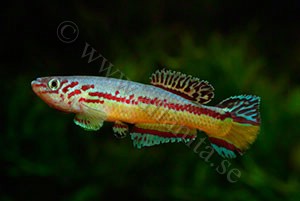
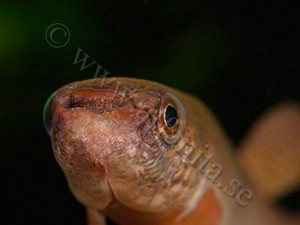
Choice of fish: There are lots of different reasons for wanting to take photos of a species or an individual. Sometimes I would like to take a “portrait” of an individual and other times one would like to take a “species photo” to show what the fish looks like. When taking a “portrait”, the sky is the limit, or maybe more precisely, the imagination of the photographer is the limit but the fish might also have something to say about that. Here the photographer really can give it his/her best shot and try to figure out new and untried ways of taking great photos. Sometimes this is really inspiring and funny. For example, if it’s egg laying tooth carps, why not show that our fishes really have teeth. Show that it’s not only the piranhas that have big, dangerous teeth :-) |
 |
|
When it comes to “species photo” of a
species or a strain, I try to get the fish to show itself from the best
side, who would like to see, for example, a Rivulus standing or
hanging in a corner, with all of it’s fins “glued” together? If I get to choose and that I do, I choose a fish that really shows off, rather then a scared little one in a corner. If one has more then one fish of a species/strain to choose from, it might be a good idea to pick the one with the best fins and the one in best condition. If none of the fishes is in good condition, it might be better to wait until they or their offspring are. If it’s not possible to wait, for any reason, a picture of a fish not at its best is of course better then no picture at all! Yes, I admit, it IS great to have a wife that breeds a lot of fishes and who can set aside an aquarium for just a couple of fishes. This way the male doesn’t get the top of his fins bitten off and the pair can grow and develop nicely. When they are fully grown one can hope that they also have nice fully developed fins and if one is really lucky, they also like to SHOW them :-) |
|
|
Time: How long a time does it take to get a great picture of a fish? I mean, a photo that one is really, really satisfied with? I’m sorry, but I can’t answer that question, but generally I can say that it takes MUCH more time that one has expected :-) On some single occasions I’ve got a great picture almost immediately after putting the fish in the tank but that isn’t often. I should guess that it’s happened to me maybe 3 or 4 times and I have made a number of tries …. Sometimes it has been done in a half an hour or an hour but most of the time it takes longer, at least for me. It has also happened more than once that it has taken several days, without getting any acceptable picture. These are the times when it’s just as well to put the fish back in its own aquarium and wait for the next time. Some species/strains are easier then others but I think that depends more on the individual than the species. But on the other hand, there are some species that I have to think more than twice before starting with ….. As a conclusion, I would like to point out that it’s FUN to take photos of ones fishes, even though it takes some time. Hopefully one gets to see the fishes at their best and one gets the evidence to show it! :-) Good luck with your own pictures! |
|
|
| This article has earlier been published in the British Killifish Associations magazine.
|